
 This project aims to create a comprehensive 3-tier DNS environment using Pi-hole, Unbound, Nebula-Sync, and Keepalived technologies. The system will be self-hosted, open source, and designed for high availability.
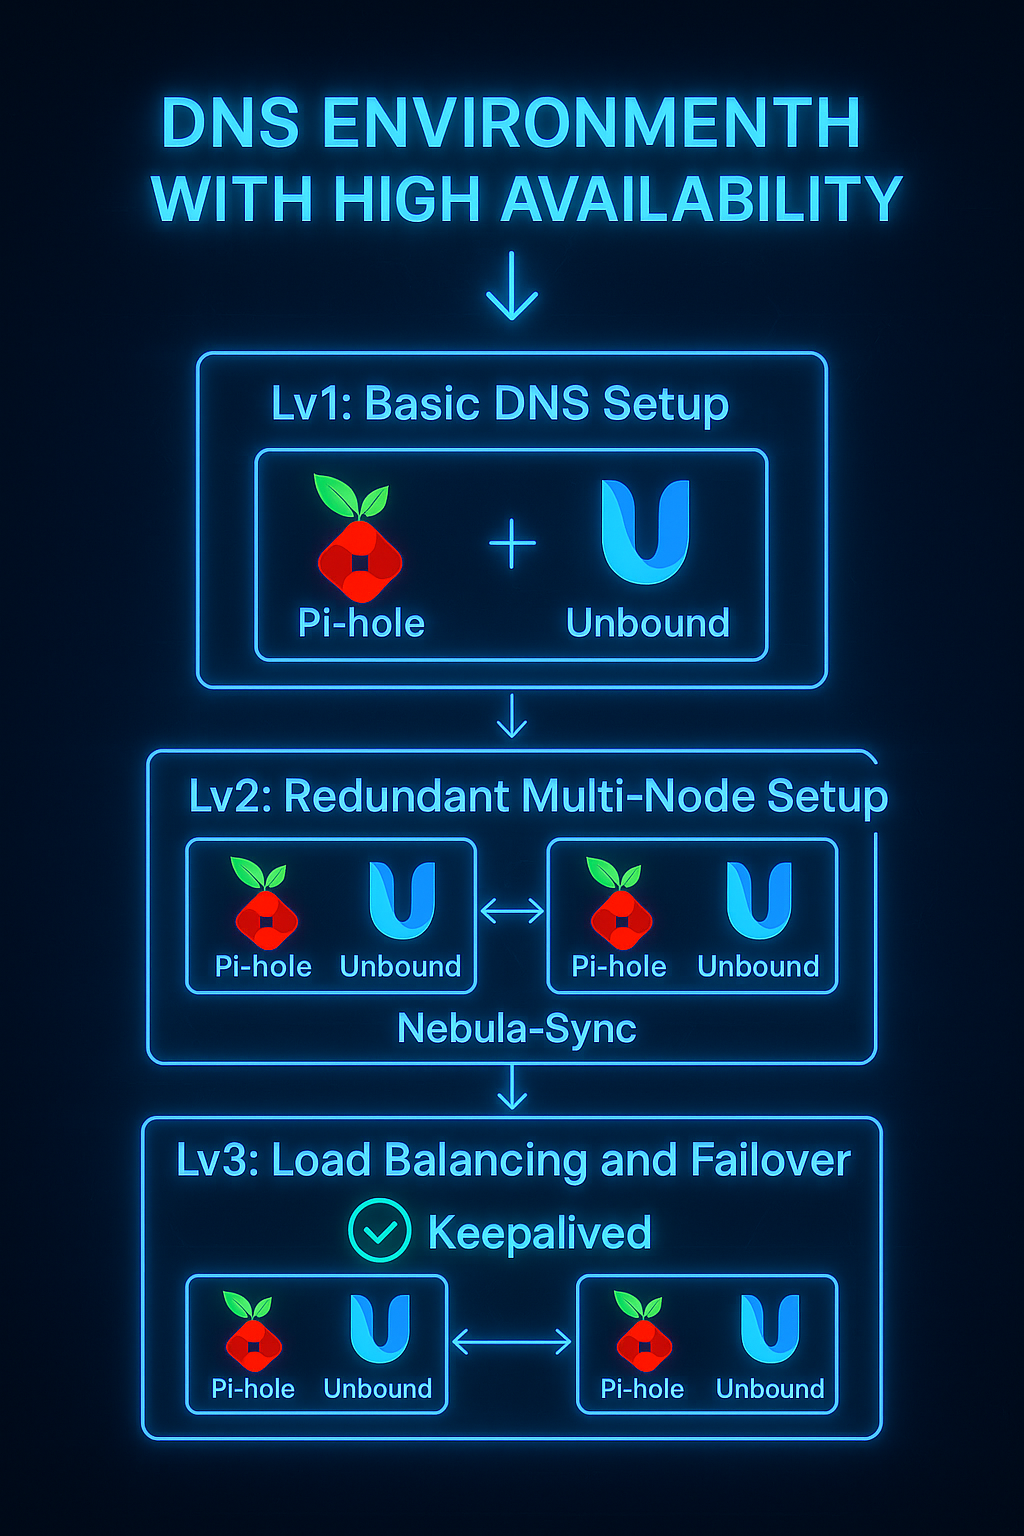
Lvl 1: Basic DNS Setup - This level consists of Pi-hole and Unbound running on a single device. Pi-hole is a network-wide DNS ad blocker that filters malicious domains, while Unbound is a recursive DNS resolver that queries authoritative servers directly for enhanced security and privacy.
Lvl 2: Redundant Multi-Node Setup - This level implements redundancy using two or more nodes on separate devices, each running Pi-hole and Unbound. Nebula-Sync (deployed via Docker) automatically synchronizes configurations, blocklists, and settings across all nodes to maintain consistent filtering behavior throughout the cluster.
Lvl 3: Load Balancing and Failover - This level adds load balancing and automatic failover using Keepalived, which manages a virtual IP address for client DNS requests. When the master node fails, Keepalived automatically promotes a backup node and transfers the virtual IP, ensuring seamless service continuity. This creates enterprise-grade DNS infrastructure with high availability while remaining completely self-hosted and open source.
Note: All installations in this guide use Debian-based distributions. If you’re using a different Linux distribution, please search for the appropriate package manager commands for your system.
Lvl 1: Basic DNS Setup
First, regardless of whether you’re using LXC, VM, or bare metal, configure a static IP address on your device.
Install Unbound
1
2
sudo apt update
sudo apt install unbound -y
Configure Unbound
1
sudo vim /etc/unbound/unbound.conf.d/pi-hole.conf
Pi-hole.conf configuration:
1
2
3
4
5
6
7
8
9
10
11
12
13
14
15
16
17
18
19
20
21
22
23
24
25
26
27
28
29
30
31
32
33
34
35
36
37
38
39
40
41
42
43
44
45
46
47
48
49
50
51
52
53
54
#https://docs.pi-hole.net/guides/dns/unbound/
server:
    # If no logfile is specified, syslog is used
    # logfile: "/var/log/unbound/unbound.log"
    verbosity: 0

    interface: 127.0.0.1
    port: 5335
    do-ip4: yes
    do-udp: yes
    do-tcp: yes

    # May be set to no if you don't have IPv6 connectivity
    do-ip6: no
    prefer-ip6: no

    # Use this only when you downloaded the list of primary root servers!
    # If you use the default dns-root-data package, unbound will find it automatically
    #root-hints: "/var/lib/unbound/root.hints"

    # Trust glue only if it is within the server's authority
    harden-glue: yes

    # Require DNSSEC data for trust-anchored zones, if such data is absent, the zone becomes BOGUS
    harden-dnssec-stripped: yes

    # Don't use Capitalization randomization as it known to cause DNSSEC issues sometimes
    # see https://discourse.pi-hole.net/t/unbound-stubby-or-dnscrypt-proxy/9378 for further details
    use-caps-for-id: no
    # buffer size. This value has also been suggested in DNS Flag Day 2020.
    edns-buffer-size: 1232

    # Perform prefetching of close to expired message cache entries
    # This only applies to domains that have been frequently queried
    prefetch: yes
    num-threads: 1

    # Ensure kernel buffer is large enough to not lose messages in traffic spikes
    so-rcvbuf: 1m

    # Ensure privacy of local IP ranges
    private-address: 192.168.0.0/16
    private-address: 169.254.0.0/16
    private-address: 172.16.0.0/12
    private-address: 10.0.0.0/8
    private-address: fd00::/8
    private-address: fe80::/10

    # Ensure no reverse queries to non-public IP ranges (RFC6303 4.2)
    private-address: 192.0.2.0/24
    private-address: 198.51.100.0/24
    private-address: 203.0.113.0/24
    private-address: 255.255.255.255/32
    private-address: 2001:db8::/32
Restart Unbound
1
sudo service unbound restart
For more information on configuration, visit: https://docs.pi-hole.net/guides/dns/unbound/
Install Pi-hole
1
curl -sSL https://install.pi-hole.net | bash
Configure Pi-hole to use Unbound
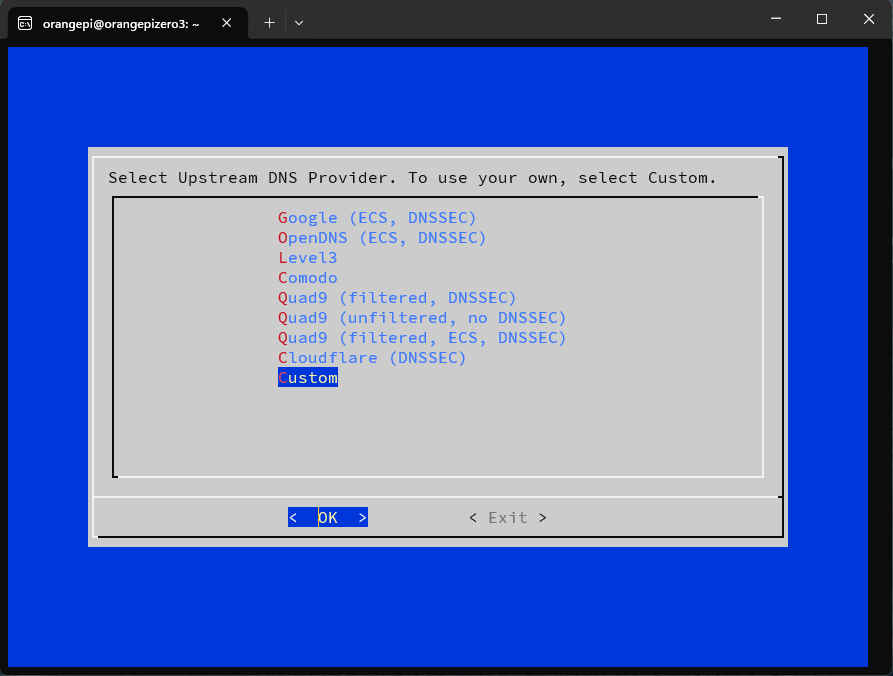 During the installation wizard, when prompted for DNS provider, select “Custom” and add:
1
127.0.0.1#5335
Set Pi-hole Password
After completing the wizard installation, set your admin password:
1
sudo pihole setpassword
Access Pi-hole Admin Panel
To access the Pi-hole admin panel, navigate to:
1
http://<your-ip>/admin/login
Replace <your-ip> with your device’s static IP address.
Lvl 2: Redundant Multi-Node Setup
For Lvl 2, we will use nebula-sync in a Docker container that will update the configuration every hour of your Pi-hole, and also we have to find another device in a different physical place and install a second Pi-hole and Unbound using the same steps from Lvl 1 above.
Deployment Options
Option 1: Docker Compose
1
2
3
4
5
6
7
8
9
10
11
services:
  nebula-sync:
    image: ghcr.io/lovelaze/nebula-sync:latest
    container_name: nebula-sync
    restart: unless-stopped
    environment:
      - PRIMARY=http://ph1.example.com|password
      - REPLICAS=http://ph2.example.com|password
      - FULL_SYNC=true
      - RUN_GRAVITY=true
      - CRON=0 * * * *
Option 2: Docker CLI
1
2
3
4
5
6
7
8
9
docker container run -d \
  --name nebula-sync \
  -e PRIMARY="http://ph1.example.com|password" \
  -e REPLICAS="http://ph2.example.com|password" \
  -e FULL_SYNC=true \
  -e RUN_GRAVITY=true \
  -e CRON="0 * * * *" \
  --restart unless-stopped \
  ghcr.io/lovelaze/nebula-sync:latest
Configuration Notes
- PRIMARY: This should be your master Pi-hole instance
- REPLICAS: These are the secondary nodes where all configurations will be replicated
- Important: If you modify configurations on replica Pi-hole instances, those changes will NOT sync back to the primary Pi-hole
Multiple Replicas: You can add multiple replica nodes by separating them with commas:
1
  http://ph2.example.com|password,http://ph3.example.com|password
Replace the example URLs with your actual Pi-hole IP addresses and use the admin passwords you configured in Lvl 1.
Lvl 3: Load Balancing and Failover
For Lvl 3, we will use Keepalived to create a virtual IP address that provides automatic failover between our Pi-hole nodes. This ensures that if the master node goes down, the backup node automatically takes over DNS services without any manual intervention.
Installation
1
sudo apt install keepalived libipset13 -y
Network Configuration
Before starting the configuration, you need to identify the static IP addresses of your nodes. Use this command to find your network interface and IP address:
1
ip -br -4 -c a
Save the interface name (e.g., eth0, ens18) and IP address for each node.
Configure Keepalived
Edit the keepalived configuration file:
1
sudo vim /etc/keepalived/keepalived.conf
Master Node Configuration
1
2
3
4
5
6
7
8
9
10
11
12
13
14
15
16
17
18
19
20
vrrp_instance VI_1 {
  state MASTER
  interface eth0
  virtual_router_id 55
  priority 200
  advert_int 1
  unicast_src_ip 10.0.0.10
  unicast_peer {
    10.0.0.20
  }

  authentication {
    auth_type PASS
    auth_pass C3P9K9gc
  }

  virtual_ipaddress {
    10.0.0.100/24
  }
}
Backup Node Configuration
1
2
3
4
5
6
7
8
9
10
11
12
13
14
15
16
17
18
19
20
vrrp_instance VI_1 {
  state BACKUP
  interface eth0
  virtual_router_id 55
  priority 100
  advert_int 1
  unicast_src_ip 10.0.0.20
  unicast_peer {
    10.0.0.10
  }

  authentication {
    auth_type PASS
    auth_pass C3P9K9gc
  }

  virtual_ipaddress {
    10.0.0.100/24
  }
}
unicast_src_ip: IP address of this node (the one running the config).unicast_peer: IP address of the other node (used for failover communication).priority: Determines which node becomes active—higher values mean higher priority. When the master fails, the node with the next highest priority takes over.auth_pass: Password used for VRRP authentication. It must be exactly 8 characters or fewer—longer passwords will be ignored or cause errors.
Enable and Start Services
Now that your load balancer is configured, restart the service and ensure it starts automatically:
1
2
sudo systemctl enable keepalived.service
sudo systemctl restart keepalived.service
Final Configuration
Your entire system is now set up. Configure your router’s DNS settings to use the virtual IP address, which in this example is 10.0.0.100. This virtual IP will automatically switch between your Pi-hole nodes as needed for high availability.
Additional Resources
Tutorials:
- Techno Tim - Video guides on Pi-hole and DNS setup
- wunderTech - Network infrastructure guides
Documentation:
- Pi-hole Docs - Official Pi-hole documentation
- Unbound Docs - Unbound resolver documentation
- Keepalived Docs - Load balancing and HA setup guide
- Nebula-Sync GitHub - Pi-hole synchronization tool